In today’s article, we would like to highlight a simple, but important topic – how to choose a simple metric to evaluate a particular dataset. Everyone has been familiar with the arithmetic mean for a long time, almost every student knows very well that you should sum up all the available values, divide by their number and get the average value. However, school knowledge does not include any alternative options, of which, in fact, there are many in statistics – almost for every occasion. In solving research and marketing problems, people often take mean as a target. Is this legitimate or is there a better option? Let’s figure it out.
To begin with, it is worth remembering the definitions of the two metrics that we will talk about today.
Mean is the most popular statistic used to calculate a data center. What is the median? Median is a value that splits data, sorted in order of increasing values, into two equal parts. This means that the median shows the central value in the sample if the number of cases is odd and the arithmetic mean of the two values if the number of cases in the sample is even.
Research tasks
So, the estimation of the sample mean is often important in many research questions. For instance, specialists studying demography often study changes in the number of regions in Russia in order to track the dynamics and reflect it in reports. Let’s try to calculate the average size of the Russian city, as well as the median, and then compare the results.
First, you need to find and load data by connecting the pandas library for this.
import pandas as pd
city = pd.read_csv('city.csv', sep = ';')
Then, you need to calculate the mean and median of the sample.
mean_pop = round (city.population_2020.mean (), 0)
median_pop = round (city.population_2020.median (), 0)
The values, of course, are different, since the distribution of observations in the sample is different from the normal one. In order to understand whether they are very different, let’s build a distribution graph and display the mean and median.
import matplotlib.pyplot as plt
import seaborn as sns

sns.set_palette('rainbow')
fig = plt.figure(figsize = (20, 15))
ax = fig.add_subplot(1, 1, 1)
g = sns.histplot(data = city, x= 'population_2020', alpha=0.6, bins = 100, ax=ax)

g.axvline(mean_pop, linewidth=2, color='r', alpha=0.9, linestyle='--', label = 'Mean = {:,.0f}'.format(mean_pop).replace(',', ' '))
g.axvline(median_pop, linewidth=2, color='darkgreen', alpha=0.9, linestyle='--', label = 'Median = {:,.0f}'.format(median_pop).replace(',', ' '))

plt.ticklabel_format(axis='x', style='plain')
plt.xlabel("Population", fontsize=20)
plt.ylabel("Number of cities", fontsize=20)
plt.title("Distribution of population of russian cities", fontsize=20)
plt.legend(fontsize="xx-large")
plt.show()
Also, on this data it is worth building a boxplot for more accurate visualization with the main distribution quantiles, median, mean and outliers.
fig = plt.figure(figsize = (10, 10))
sns.set_theme(style="whitegrid")
sns.set_palette(palette="pastel")

sns.boxplot(y = city['population_2020'], showfliers = False)

plt.scatter(0, 550100, marker='*', s=100, color = 'black', label = 'Outlier')
plt.scatter(0, 560200, marker='*', s=100, color = 'black')
plt.scatter(0, 570300, marker='*', s=100, color = 'black')
plt.scatter(0, mean_pop, marker='o', s=100, color = 'red', edgecolors = 'black', label = 'Mean')
plt.legend()

plt.ylabel("Population", fontsize=15)
plt.ticklabel_format(axis='y', style='plain')
plt.title("Boxplot of population of russian cities", fontsize=15)
plt.show()
It follows from the graphs that the median is significantly less than the average, and it is also clear that this is a consequence of the presence of outliers which are Moscow and St. Petersburg. Since the arithmetic mean is an extremely sensitive metric to outliers, it is not worth relying on conclusions about the mean if they are present in the sample. An increase or decrease in the population of Moscow can greatly change the average population in Russia, but this will not affect the real regional trend.
Using the arithmetic mean, we say that the number of a typical (average) city in the Russian Federation is 268 thousand people. However, this misleads us, since the mean value is significantly higher than the median solely due to the size of the population of Moscow and St. Petersburg. In fact, the number of a typical Russian city is significantly less (2 times less!) and is approximately 104 thousand citizens.
Marketing tasks
In a business tasks, the difference between the mean and the median is also important, as using the wrong metric can seriously affect the results of the advertising campaign or make it difficult to achieve the goal. Let’s take a look at a real example of the difficulties an entrepreneur can face in retail if he chooses the wrong target metric.
To begin with, as in the previous example, let’s load a dataset about supermarket purchases. Let’s select the dataset columns necessary for analysis and rename them to simplify the code in the future. Since this data is not as well prepared as the previous ones, it is necessary to group all purchased items by receipts. In this case, it is necessary to group by two variables: by the customer’s id and by the date of purchase (the date and time is determined by the moment of closing the bill, therefore, all purchases within one bill coincide by date variable). Then, let’s name the resulting column “total_bill”, that is, the check amount and calculate the average and median.
df = pd.read_excel ('invoice_data.xlsx')
df.columns = ['user', 'total_price', 'date']
groupped_df = pd.DataFrame (df.groupby (['user', 'date']). total_price.sum ())
groupped_df.columns = ['total_bill']
mean_bill = groupped_df.total_bill.mean ()
median_bill = groupped_df.total_bill.median ()
Now, as in the previous example, you need to plot the distribution of customer checks and boxplot, and also display the median and mean on each of them.
sns.set_palette('rainbow')
fig = plt.figure(figsize = (20, 15))
ax = fig.add_subplot(1, 1, 1)
sns.histplot(groupped_df, x = 'total_bill', binwidth=200, alpha=0.6, ax=ax)
plt.xlabel("Purchases", fontsize=20)
plt.ylabel("Total bill", fontsize=20)
plt.title("Distribution of total bills", fontsize=20)
plt.axvline(mean_bill, linewidth=2, color='r', alpha=1, linestyle='--', label = 'Mean = {:.0f}'.format(mean_bill))
plt.axvline(median_bill, linewidth=2, color='darkgreen', alpha=1, linestyle='--', label = 'Median = {:.0f}'.format(median_bill))
plt.legend(fontsize="xx-large")
plt.show()
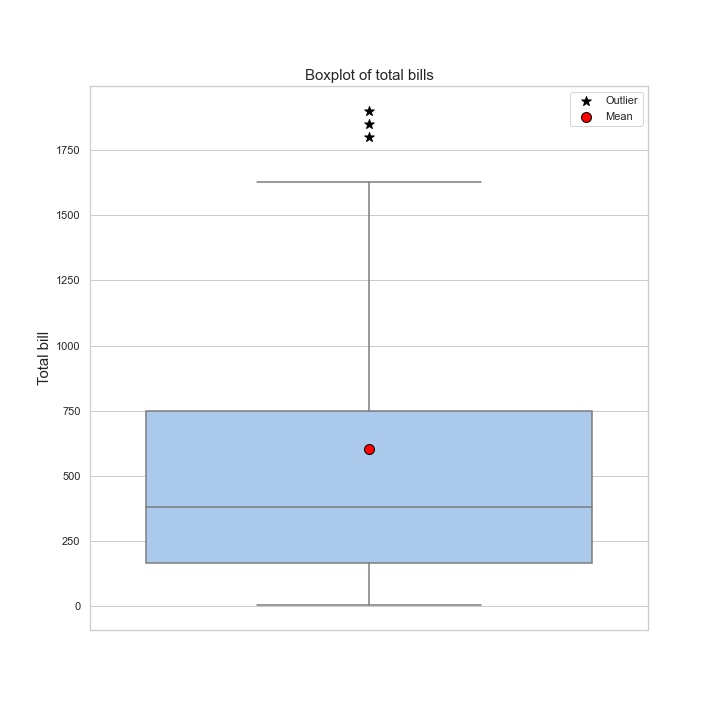
fig = plt.figure(figsize = (10, 10))
sns.set_theme(style="whitegrid")
sns.set_palette(palette="pastel")

sns.boxplot(y = groupped_df['total_bill'], showfliers = False)

plt.scatter(0, 1800, marker='*', s=100, color = 'black', label = 'Outlier')
plt.scatter(0, 1850, marker='*', s=100, color = 'black')
plt.scatter(0, 1900, marker='*', s=100, color = 'black')
plt.scatter(0, mean_bill, marker='o', s=100, color = 'red', edgecolors = 'black', label = 'Mean')
plt.legend()

plt.ticklabel_format(axis='y', style='plain')
plt.ylabel("Total bill", fontsize=15)
plt.title("Boxplot of total bills", fontsize=15)
plt.show()
The graphs show that the distribution is different from normal, which means that the median and mean are not equal. The median value is smaller than the average by about 220 rubles.
Now, imagine that marketers have a task to increase the average buyer’s bill. A marketer may decide that since the average check is 601 rubles, the following promotion can be offered: “All buyers who make a purchase over 600 rubles, will get 20% discount on any good for 100 rubles.” In general, it is a reasonable offer, however, in reality, the average check is lower – 378 rubles. Thus, the majority of buyers will not be interested in the offer, since their purchase usually does not reach the proposed threshold. This means, that they will not take advantage of the offer and will not receive a discount, and the company will not be able to achieve its goal and increase the profit. The point is that the initial assumptions were wrong.
Conclusions
As you already understood, the mean often shows a more pleasant result, both for business and for research tasks, because it is always nicer to imagine the situation with the average check or the demographic situation in the country better than it really is. However, one must always remember about the shortcomings of mean in order to be able to correctly choose the appropriate analogue for assessing a particular situation.