


VIsualizing COVID-19 in Russia with Plotly
⏱ Время чтения текста – 9 минутMaps are widely used in data visualization, it’s a great tool to display statistics for certain areas, regions, and cities. Before displaying the map we need to encode each region or any other administrative unit. Choropleth map gets divided into polygons and multipolygons with latitude and longitude coordinates. Plotly has a built-in solution for plotting choropleth map for America and Europe regions, however, Russia is not included yet. So we decided to use an existing GeoJSON file to map administrative regions of Russia and display the latest COVID-19 stats with Plotly.
from urllib.request import urlopen
import json
import requests
import pandas as pd
from selenium import webdriver
from bs4 import BeautifulSoup as bs
import plotly.graph_objects as go
Modifying GeoJSON
First, we need to download a public GeoJSON file with the boundaries for the Federal subjects of Russia. The file already contains some information, such as region names, but it’s still doesn’t fit the required format and missing region identifiers.
with urlopen('https://raw.githubusercontent.com/codeforamerica/click_that_hood/master/public/data/russia.geojson') as response:
    counties = json.load(response)
Besides that, there are slight differences in the namings. For example, Bashkortostan on стопкоронавирус.рф, the site we are going to scrape data from, it’s listed as “The Republic of Bashkortostan”, while in our GeoJSON file it’s simply named “Bashkortostan”. These differences should be eliminated to avoid possible confusion. Also, the names should start with a capital.
regions_republic_1 = ['Бурятия', 'Тыва', 'Адыгея', 'Татарстан', 'Марий Эл',
                      'Чувашия', 'Северная Осетия – Алания', 'Алтай',
                      'Дагестан', 'Ингушетия', 'Башкортостан']
regions_republic_2 = ['Удмуртская республика', 'Кабардино-Балкарская республика',
                      'Карачаево-Черкесская республика', 'Чеченская республика']
for k in range(len(counties['features'])):
    counties['features'][k]['id'] = k
    if counties['features'][k]['properties']['name'] in regions_republic_1:
        counties['features'][k]['properties']['name'] = 'Республика ' + counties['features'][k]['properties']['name']
    elif counties['features'][k]['properties']['name'] == 'Ханты-Мансийский автономный округ - Югра':
        counties['features'][k]['properties']['name'] = 'Ханты-Мансийский АО'
    elif counties['features'][k]['properties']['name'] in regions_republic_2:
        counties['features'][k]['properties']['name'] = counties['features'][k]['properties']['name'].title()
It’s time to create a DataFrame from the resulting GeoJSON file with the regions of Russia, we’ll take the identifiers and names.
region_id_list = []
regions_list = []
for k in range(len(counties['features'])):
    region_id_list.append(counties['features'][k]['id'])
    regions_list.append(counties['features'][k]['properties']['name'])
df_regions = pd.DataFrame()
df_regions['region_id'] = region_id_list
df_regions['region_name'] = regions_list
As a result, our DataFrame looks like the following:

Data Scraping
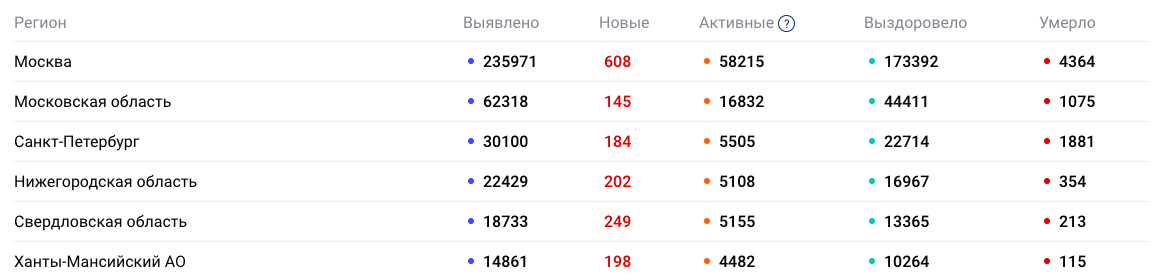
We need to scrape the data stored in this table:
Let’s use the Selenium library for this task. We need to navigate to the webpage and convert it into a BeautifulSoup object
driver = webdriver.Chrome()
driver.get('https://стопкоронавирус.рф/information/')
source_data = driver.page_source
soup = bs(source_data, 'lxml')
The region names are wrapped with <th> tags, while the latest data is stored in table cells, each one is defined with a <td> tag.

divs_data = soup.find_all('td')The divs_data list should return something like this:

The data is grouped in one line, this includes both new cases and active ones. It is noticeable that each region corresponds to five values, for Moscow these are the first five, for Moscow Region the next five and so on. We can use this pattern to create five lists and populate with values according to the index. The first value will be appended to the list with active cases, the second value to the list of new ones, etc. After every five values, the index will be reset to zero.
count = 1
for td in divs_data:
    if count == 1:
        sick_list.append(int(td.text))
    elif count == 2:
        new_list.append(int(td.text))
    elif count == 3:
        cases_list.append(int(td.text))
    elif count == 4:
        healed_list.append(int(td.text))
    elif count == 5:
        died_list.append(int(td.text))
        count = 0
    count += 1
The next step is to extract the region names from the table, they are stored within the col-region class. We also need to clean up the data by eliminating extra white spaces and line breaks.
divs_region_names = soup.find_all('th', {'class':'col-region'})
region_names_list = []
for i in range(1, len(divs_region_names)):
    region_name = divs_region_names[i].text
    region_name = region_name.replace('\n', '').replace('  ', '')
    region_names_list.append(region_name)
Create a DataFrame:
df = pd.DataFrame()
df['region_name'] = region_names_list
df['sick'] = sick_list
df['new'] = new_list
df['cases'] = cases_list
df['healed'] = healed_list
df['died'] = died_list
After reviewing our data once again we detected white space under the index 10. This should be fixed immediately, otherwise, we may run into problems.

df.loc[10, 'region_name'] = df[df.region_name == 'Челябинская область '].region_name.item().strip(' ')Finally, we can merge our DataFrame on the region_name column, so that the resulted table will include a column with region id, which is required to make a choropleth map.
df = df.merge(df_regions, on='region_name')Creating a choropleth map with Plotly
Let’s create a new figure and pass a choroplethmapbox object to it. The geojson parameter will accept the counties variable with the GeoJSON file, assign the region_id to locations. The z parameter represents the data to be color-coded, in this example we’re passing the number of new cases for each region. Assign the region names to text. The colorscale parameter accepts lists with values ranging from 0 to 1 and RGB color codes. Here, the palette changes from green to yellow and then red, depending on the number of active cases. By passing the values stored in customdata we can change our hovertemplate.
fig = go.Figure(go.Choroplethmapbox(geojson=counties,
                           locations=df['region_id'],
                           z=df['new'],
                           text=df['region_name'],
                           colorscale=[[0, 'rgb(34, 150, 79)'],
                                       [0.2, 'rgb(249, 247, 174)'],
                                       [0.8, 'rgb(253, 172, 99)'],
                                       [1, 'rgb(212, 50, 44)']],
                           colorbar_thickness=20,
                           customdata=np.stack([df['cases'], df['died'], df['sick'], df['healed']], axis=-1),
                           hovertemplate='<b>%{text}</b>'+ '<br>' +
                                         'New cases: %{z}' + '<br>' +
                                         'Active cases: %{customdata[0]}' + '<br>' +
                                         'Deaths: %{customdata[1]}' + '<br>' +
                                         'Total cases: %{customdata[2]}' + '<br>' +
                                         'Recovered: %{customdata[3]}' +
                                         '<extra></extra>',
                           hoverinfo='text, z'))
Let’s customize the map, we will use a ready-to-go neutral template, called carto-positron. Set the parameters and display the map:
mapbox_zoom: responsible for zooming;
mapbox_center: centers the map;
marker_line_width: border width (we removed the borders by setting this parameter to 0);
margin: usually accepts 0 values to make the map wider.
fig.update_layout(mapbox_style="carto-positron",
                  mapbox_zoom=1, mapbox_center = {"lat": 66, "lon": 94})
fig.update_traces(marker_line_width=0)
fig.update_layout(margin={"r":0,"t":0,"l":0,"b":0})
fig.show()
And here is our map. According to the plot, we can say that the highest number of cases per day is happening in Moscow – 608 new cases. It’s really high compared to the other regions, and especially to Nenets Autonomous Okrug, where this number is surprisingly low.