


QR code recognition for sales receipts with Skimage
⏱ Время чтения текста – 7 минутWhen we want to scan a QR code the image quality matters, and oftentimes the image may look blurred and defocused. To address this problem and suppress unwanted distortions we can use image pre-processing. In today’s article we will discover how to improve QR code recognition with the help of scikit-image library.
from matplotlib import pyplot as plt
import skimage
from skimage import util, exposure, io, measure, feature
from scipy import ndimage as ndi
import numpy as np
import cv2
Subject
Let’s try to scan this till receipt from our preceding article “Collecting data from hypermarket receipts on Python”. Use the imread() function to read our image and then display it.
img = plt.imread('чек.jpg')
plt.imshow(img)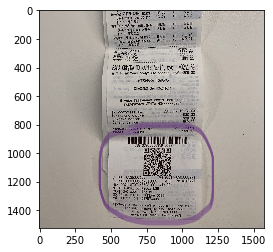
It seems hardly possible to read any letter from this blurred image. Let’s try to do this again with a predefined function from the opencv library:
def qr_reader(img):
    detector = cv2.QRCodeDetector()
    data, bbox, _ = detector.detectAndDecode(img)
    if data:
        print(data)
    else:
        print('Ooops! Nothing here...')
Scan our image once again:
qr_reader(img)Ooops! Nothing here...That’s not surprising, the abundance of pixels makes it difficult for the scanner to recognize the QR code. Nevertheless, we can simplify the task by specifying the edges of the QR image.
Solution
First, let us remove all the unnecessary pixels, find the coordinates of the QR code and pass it to the qr_reader function. First off, remove noise in the image using the median filter and convert our RGB image to grayscale, as QR-codes are composed of only two colors.
image = ndi.median_filter(util.img_as_float(img), size=9)
image = skimage.color.rgb2gray(image)
plt.imshow(image, cmap='gray')
The median filter blurred our image, and the scattered pixels have become less clear, while the QR code looks much better now. Apply the adjust_gamma function to our image. This function exponentiates the gamma value of each pixel, less gamma means that the pixel will be closer to white color. We will set gamma to 0.5.
pores_gamma = exposure.adjust_gamma(image, gamma=0.5)
plt.imshow(pores_gamma, cmap='gray')
We can see clear improvements, the QR code is now much distinct than previously. Let’s take advantage of it and set all pixels with a value of less than 0.3 to 0, while others to 1.
thresholded = (pores_gamma <= 0.3)
plt.imshow(thresholded, cmap='gray')
Now, let’s apply the Canny filter to our thresholded image. This filter smoothes the image and calculate the gradients, the edges are where the gradient at maximum. With the increasing sigma parameter, the canny filter stops discerning less clear edges.
edge = feature.canny(thresholded, sigma=6)
plt.imshow(edge)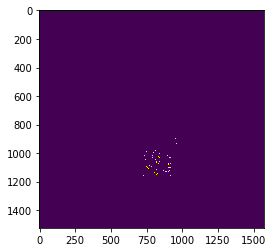
Outline the QR code with the coordinates of the edges. We can calculate them with the find_contours method and draw them atop the image. Coordinates are stored in the contours array.
contours = measure.find_contours(edge, 0.5)
plt.imshow(edge)
for contour in contours:
    plt.plot(contour[:,1], contour[:,0], linewidth=2)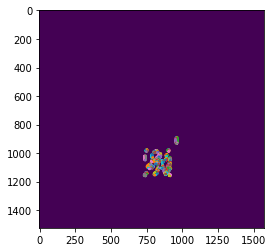
We will take minimum and maximum coordinates for X and Y axes, thus drawing a visible rectangle.
positions = np.concatenate(contours, axis=0)
min_pos_x = int(min(positions[:,1]))
max_pos_x = int(max(positions[:,1]))
min_pos_y = int(min(positions[:,0]))
max_pos_y = int(max(positions[:,0]))
Having the coordinates, we can ensquare the code area:
start = (min_pos_x, min_pos_y)
end = (max_pos_x, max_pos_y)
cv2.rectangle(img, start, end, (255, 0, 0), 5)
io.imshow(img)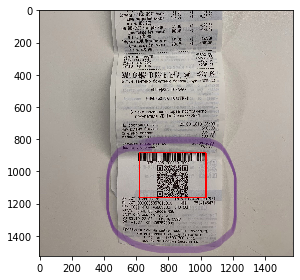
Let’s try to cut this area according to our coordinates:
new_img = img[min_pos_y:max_pos_y, min_pos_x:max_pos_x]
plt.imshow(new_img)
Pass the new image to the qr_reader function:
qr_reader(new_img)And it returns this:
t=20190320T2303&s=5803.00&fn=9251440300007971&i=141637&fp=4087570038&n=1That’s exactly what we need! Of course, the script is not universal and every image is unique, some may have too much noise or low contrast, while others may not. The sequence of actions depends on the case. Next time, we will show the subsequent stage of image processing using a well-established python library.