27 posts tagged

python

Later Ctrl + ↑

Python and lyrics of Zemfira’s new album: capturing the spirit of her songs

Время чтения текста – 16 минут

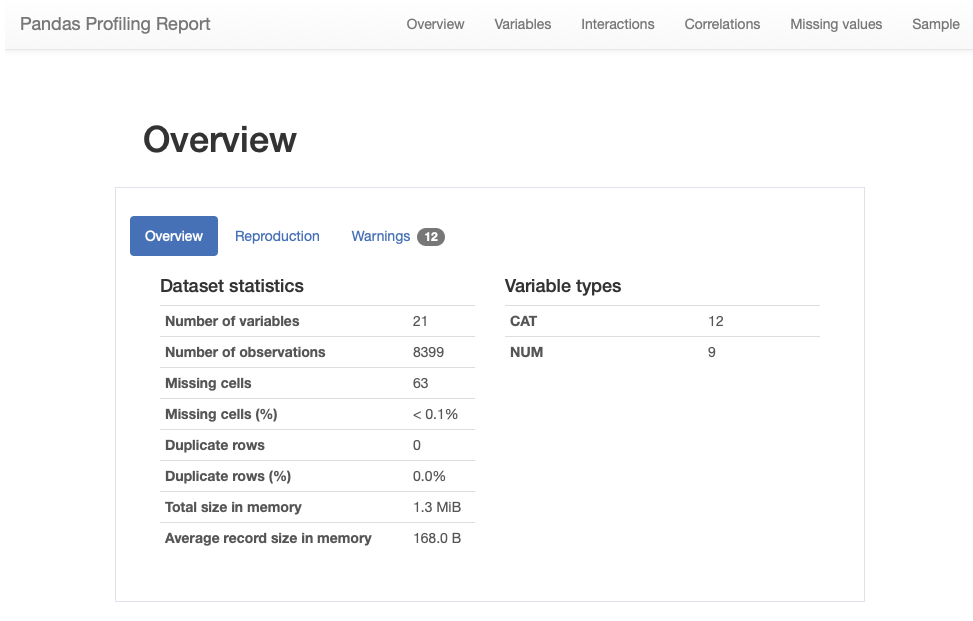
Zemfira’s latest studio album, Borderline, was released in February, 8 years after the previous one. For this album, various people cooperated with her, including her relatives – the riff for the song “Таблетки” was written by her nephew from London. The album turned out to be diverse: for instance, the song “Остин” is dedicated to the main character of the Homescapes game by the Russian studio Playrix (by the way, check out the latest Business Secrets with the Bukhman brothers, they also mention it there). Zemfira liked the game a lot, thus, she contacted Playrix to create this song. Also, the song “Крым” was written as a soundtrack to a new film by Zemfira’s colleague Renata Litvinova.

Listen new album in Apple Music / Яндекс.Музыке / Spotify

Nevertheless, the spirit of the whole album is rather gloomy – the songs often repeat the words ‘боль’, ‘ад’, ‘бесишь’ and other synonyms. We decided to conduct an exploratory analysis of her album, and then, using the Word2Vec model and a cosine measure, look at the semantic closeness of the songs and calculate the general mood of the album.

For those who are bored with reading about data preparation and analysis steps, you can go directly to the results.

Data preparation

For starters, we write a data processing script. The purpose of the script is to collect a united csv-table from a set of text files, each of which contains a song. At the same time, we have to get rid of all punctuation marks and unnecessary words as we need to focus only on significant content.

import pandas as pd
import re
import string
import pymorphy2
from nltk.corpus import stopwords

Then we create a morphological analyzer and expand the list of everything that needs to be discarded:

morph = pymorphy2.MorphAnalyzer()
stopwords_list = stopwords.words('russian')
stopwords_list.extend(['куплет', 'это', 'я', 'мы', 'ты', 'припев', 'аутро', 'предприпев', 'lyrics', '1', '2', '3', 'то'])
string.punctuation += '—'

The names of the songs are given in English, so we have to create a dictionary for translation into Russian and a dictionary, from which we will later make a table:

result_dict = dict()

songs_dict = {
    'snow':'снег идёт',
    'crimea':'крым',
    'mother':'мама',
    'ostin':'остин',
    'abuse':'абьюз',
    'wait_for_me':'жди меня',
    'tom':'том',
    'come_on':'камон',
    'coat':'пальто',
    'this_summer':'этим летом',
    'ok':'ок',
    'pills':'таблетки'
}

Let’s define several necessary functions. The first one reads the entire song from the file and removes line breaks, the second clears the text from unnecessary characters and words, and the third one converts the words to normal form, using the pymorphy2 morphological analyzer. The pymorphy2 module does not always handle ambiguity well – additional processing is required for the words ‘ад’ and ‘рай’.

def read_song(filename):
    f = open(f'{filename}.txt', 'r').read()
    f = f.replace('\n', ' ')
    return f

def clean_string(text):
    text = re.split(' |:|\.|\(|\)|,|"|;|/|\n|\t|-|\?|\[|\]|!', text)
    text = ' '.join([word for word in text if word not in string.punctuation])
    text = text.lower()
    text = ' '.join([word for word in text.split() if word not in stopwords_list])
    return text

def string_to_normal_form(string):
    string_lst = string.split()
    for i in range(len(string_lst)):
        string_lst[i] = morph.parse(string_lst[i])[0].normal_form
        if (string_lst[i] == 'аду'):
            string_lst[i] = 'ад'
        if (string_lst[i] == 'рая'):
            string_lst[i] = 'рай'
    string = ' '.join(string_lst)
    return string

After all this preparation, we can get back to the data and process each song and read the file with the corresponding name:

name_list = []
text_list = []
for song, name in songs_dict.items():
    text = string_to_normal_form(clean_string(read_song(song)))
    name_list.append(name)
    text_list.append(text)

Then we combine everything into a DataFrame and save it as a csv-file.

df = pd.DataFrame()
df['name'] = name_list
df['text'] = text_list
df['time'] = [290, 220, 187, 270, 330, 196, 207, 188, 269, 189, 245, 244]
df.to_csv('borderline.csv', index=False)

Result:

Word cloud for the whole album

To begin with the analysis, we have to construct a word cloud, because it can display the most common words found in these songs. We import the required libraries, read the csv-file and set the configurations:

import nltk
from wordcloud import WordCloud
import pandas as pd
import matplotlib.pyplot as plt
from nltk import word_tokenize, ngrams

%matplotlib inline
nltk.download('punkt')
df = pd.read_csv('borderline.csv')

Now we create a new figure, set the design parameters and, using the word cloud library, display words with the size directly proportional to the frequency of the word. We additionally indicate the name of the song above the corresponding graph.

fig = plt.figure()
fig.patch.set_facecolor('white')
plt.subplots_adjust(wspace=0.3, hspace=0.2)
i = 1
for name, text in zip(df.name, df.text):
    tokens = word_tokenize(text)
    text_raw = " ".join(tokens)
    wordcloud = WordCloud(colormap='PuBu', background_color='white', contour_width=10).generate(text_raw)
    plt.subplot(4, 3, i, label=name,frame_on=True)
    plt.tick_params(labelsize=10)
    plt.imshow(wordcloud)
    plt.axis("off")
    plt.title(name,fontdict={'fontsize':7,'color':'grey'},y=0.93)
    plt.tick_params(labelsize=10)
    i += 1

EDA of the lyrics

Let us move to the next part and analyze the lyrics. To do this, we have to import special libraries to deal with data and visualization:

import plotly.graph_objects as go
import plotly.figure_factory as ff
from scipy import spatial
import collections
import pymorphy2
import gensim

morph = pymorphy2.MorphAnalyzer()

Firstly, we should count the overall number of words in each song, the number of unique words, and their percentage:

songs = []
total = []
uniq = []
percent = []

for song, text in zip(df.name, df.text):
    songs.append(song)
    total.append(len(text.split()))
    uniq.append(len(set(text.split())))
    percent.append(round(len(set(text.split())) / len(text.split()), 2) * 100)

All this information should be written in a DataFrame and additionally we want to count the number of words per minute for each song:

df_words = pd.DataFrame()
df_words['song'] = songs
df_words['total words'] = total
df_words['uniq words'] = uniq
df_words['percent'] = percent
df_words['time'] = df['time']
df_words['words per minute'] = round(total / (df['time'] // 60))
df_words = df_words[::-1]

It would be great to visualize the data, so let us build two bar charts: one for the number of words in the song, and the other one for the number of words per minute.

colors_1 = ['rgba(101,181,205,255)'] * 12
colors_2 = ['rgba(62,142,231,255)'] * 12

fig = go.Figure(data=[
    go.Bar(name='📝 Total number of words,
           text=df_words['total words'],
           textposition='auto',
           x=df_words.song,
           y=df_words['total words'],
           marker_color=colors_1,
           marker=dict(line=dict(width=0)),),
    go.Bar(name='🌀 Unique words',
           text=df_words['uniq words'].astype(str) + '<br>'+ df_words.percent.astype(int).astype(str) + '%' ,
           textposition='inside',
           x=df_words.song,
           y=df_words['uniq words'],
           textfont_color='white',
           marker_color=colors_2,
           marker=dict(line=dict(width=0)),),
])

fig.update_layout(barmode='group')

fig.update_layout(
    title = 
        {'text':'<b>The ratio of the number of unique words to the total</b><br><span style="color:#666666"></span>'},
    showlegend = True,
    height=650,
    font={
        'family':'Open Sans, light',
        'color':'black',
        'size':14
    },
    plot_bgcolor='rgba(0,0,0,0)',
)
fig.update_layout(legend=dict(
    yanchor="top",
    xanchor="right",
))

fig.show()
colors_1 = ['rgba(101,181,205,255)'] * 12
colors_2 = ['rgba(238,85,59,255)'] * 12

fig = go.Figure(data=[
    go.Bar(name='⏱️ Track length, min.',
           text=round(df_words['time'] / 60, 1),
           textposition='auto',
           x=df_words.song,
           y=-df_words['time'] // 60,
           marker_color=colors_1,
           marker=dict(line=dict(width=0)),
          ),
    go.Bar(name='🔄 Words per minute',
           text=df_words['words per minute'],
           textposition='auto',
           x=df_words.song,
           y=df_words['words per minute'],
           marker_color=colors_2,
           textfont_color='white',
           marker=dict(line=dict(width=0)),
          ),
])

fig.update_layout(barmode='overlay')

fig.update_layout(
    title = 
        {'text':'<b>Track length and words per minute</b><br><span style="color:#666666"></span>'},
    showlegend = True,
    height=650,
    font={
        'family':'Open Sans, light',
        'color':'black',
        'size':14
    },
    plot_bgcolor='rgba(0,0,0,0)'
)


fig.show()

Working with Word2Vec model

Using the gensim module, load the model pointing to a binary file:

model = gensim.models.KeyedVectors.load_word2vec_format('model.bin', binary=True)

Для материала мы использовали готовую обученную на Национальном Корпусе Русского Языка модель от сообщества RusVectōrēs

The Word2Vec model is based on neural networks and allows you to represent words in the form of vectors, taking into account the semantic component. It means that if we take two words – for instance, “mom” and “dad”, then represent them as two vectors and calculate the cosine, the values ​​will be close to 1. Similarly, two words that have nothing in common in their meaning have a cosine measure close to 0.

Now we will define the get_vector function: it will take a list of words, recognize a part of speech for each word, and then receive and summarize vectors, so that we can find vectors even for whole sentences and texts.

def get_vector(word_list):
    vector = 0
    for word in word_list:
        pos = morph.parse(word)[0].tag.POS
        if pos == 'INFN':
            pos = 'VERB'
        if pos in ['ADJF', 'PRCL', 'ADVB', 'NPRO']:
            pos = 'NOUN'
        if word and pos:
            try:
                word_pos = word + '_' + pos
                this_vector = model.word_vec(word_pos)
                vector += this_vector
            except KeyError:
                continue
    return vector

For each song, find a vector and select the corresponding column in the DataFrame:

vec_list = []
for word in df['text']:
    vec_list.append(get_vector(word.split()))
df['vector'] = vec_list

So, now we should compare these vectors with one another, calculating their cosine proximity. Those songs with a cosine metric higher than 0.5 will be saved separately – this way we will get the closest pairs of songs. We will write the information about the comparison of vectors into the two-dimensional list result.

similar = dict()
result = []
for song_1, vector_1 in zip(df.name, df.vector):
    sub_list = []
    for song_2, vector_2 in zip(df.name.iloc[::-1], df.vector.iloc[::-1]):
        res = 1 - spatial.distance.cosine(vector_1, vector_2)
        if res > 0.5 and song_1 != song_2 and (song_1 + ' / ' + song_2 not in similar.keys() and song_2 + ' / ' + song_1 not in similar.keys()):
            similar[song_1 + ' / ' + song_2] = round(res, 2)
        sub_list.append(round(res, 2))
    result.append(sub_list)

Moreover, we can construct the same bar chart:

df_top_sim = pd.DataFrame()
df_top_sim['name'] = list(similar.keys())
df_top_sim['value'] = list(similar.values())
df_top_sim.sort_values(by='value', ascending=False)

И построим такой же bar chart:

colors = ['rgba(101,181,205,255)'] * 5

fig = go.Figure([go.Bar(x=df_top_sim['name'],
                        y=df_top_sim['value'],
                        marker_color=colors,
                        width=[0.4,0.4,0.4,0.4,0.4],
                        text=df_top_sim['value'],
                        textfont_color='white',
                        textposition='auto')])

fig.update_layout(
    title = 
        {'text':'<b>Топ-5 closest songs</b><br><span style="color:#666666"></span>'},
    showlegend = False,
    height=650,
    font={
        'family':'Open Sans, light',
        'color':'black',
        'size':14
    },
    plot_bgcolor='rgba(0,0,0,0)',
    xaxis={'categoryorder':'total descending'}
)

fig.show()

Given the vector of each song, let us calculate the vector of the entire album – add the vectors of the songs. Then, for such a vector, using the model, we get the words that are the closest in spirit and meaning.

def get_word_from_tlist(lst):
    for word in lst:
        word = word[0].split('_')[0]
        print(word, end=' ')

vec_sum = 0
for vec in df.vector:
    vec_sum += vec
sim_word = model.similar_by_vector(vec_sum)
get_word_from_tlist(sim_word)

небо тоска тьма пламень плакать горе печаль сердце солнце мрак

This is probably the key result and the description of Zemfira’s album in just 10 words.

Finally, we build a general heat map, each cell of which is the result of comparing the texts of two tracks with a cosine measure.

colorscale=[[0.0, "rgba(255,255,255,255)"],
            [0.1, "rgba(229,232,237,255)"],
            [0.2, "rgba(216,222,232,255)"],
            [0.3, "rgba(205,214,228,255)"],
            [0.4, "rgba(182,195,218,255)"],
            [0.5, "rgba(159,178,209,255)"],
            [0.6, "rgba(137,161,200,255)"],
            [0.7, "rgba(107,137,188,255)"],
            [0.8, "rgba(96,129,184,255)"],
            [1.0, "rgba(76,114,176,255)"]]

font_colors = ['black']
x = list(df.name.iloc[::-1])
y = list(df.name)
fig = ff.create_annotated_heatmap(result, x=x, y=y, colorscale=colorscale, font_colors=font_colors)
fig.show()

Results and data interpretation

To give valuable conclusions, we would like to take another look at everything we got. First of all, let us focus on the word cloud. It is easy to see that the words ‘боль’, ‘невозможно’, ‘сорваться’, ‘растерзаны’, ‘сложно’, ‘терпеть’, ‘любить’ have a very decent size, because such words are often found throughout the entire lyrics:

Давайте ещё раз посмотрим на всё, что у нас получилось — начнём с облака слов. Нетрудно заметить, что у слов «боль», «невозможно», «сорваться», «растерзаны», «сложно», «терпеть», «любить» размер весьма приличный — всё потому, что такие слова встречаются часто на протяжении всего текста песен:

The song “Крым” turned out to be one of the most diverse songs – it contains 74% of unique words. Also, the song “Снег идет” contains very few words, so the majority, which is 82%, are unique. The largest song on the album in terms of amount of words is the track “Таблетки” – there are about 150 words in total.

As it was shown on the last chart, the most dynamic track is “Таблетки”, as much as 37 words per minute – nearly one word for every two seconds – and the longest track is “Абьюз”, and according to the previous chart, it also has the lowest percentage of unique words – 46%.

Top 5 most semantically similar text pairs:

We also got the vector of the entire album and found the closest words. Just take a look at them – ‘тьма’, ‘тоска’, ‘плакать’, ‘горе’, ‘печаль’, ‘сердце’ – this is the list of words that characterizes Zemfira’s lyrics!

небо тоска тьма пламень плакать горе печаль сердце солнце мрак

The final result is a heat map. From the visualization, it is noticeable that almost all songs are quite similar to each other – the cosine measure for many pairs exceeds the value of 0.4.

Conclusions

In the material, we carried out an EDA of the entire text of the new album and, using the pre-trained Word2Vec model, we proved the hypothesis – most of the “Borderline” songs are permeated with rather dark lyrics. However, this is normal, because we love Zemfira precisely for her sincerity and straightforwardness.

 No comments    354   2021   analysis   Analytics engineering   data analytics   plotly   python

Target audience parsing in VK

Время чтения текста – 5 минут

When posting ads some platforms allow uploading the list of people who will see the ad in audience settings. There are special tools to parse ids from public pages but it’s much more interesting (and cheaper) to do it manually with Python and VK API. Today we will tell how we parsed the target audience for the LEFTJOIN promotional campaign and uploaded it to the advertising account.

Parsing of users

To send requests we will need a user token and the list of VK groups whose participants we want to get. We collected about 30 groups related to analytics, BI tools and Data Science.

import requests 
import time 

group_list = ['datacampus', '185023286', 'data_mining_in_action', '223456', '187222444', 'nta_ds_ai', 'business__intelligence', 'club1981711', 'datascience', 'ozonmasters', 'businessanalysts', 'datamining.team', 'club.shad', '174278716', 'sqlex', 'sql_helper', 'odssib', 'sapbi', 'sql_learn', 'hsespbcareer', 'smartdata', 'pomoshch_s_spss', 'dwhexpert', 'k0d_ds', 'sql_ex_ru', 'datascience_ai', 'data_club', 'mashinnoe_obuchenie_ai_big_data', 'womeninbigdata', 'introstats', 'smartdata', 'data_mining_in_action', 'dlschool_mipt'] 

token = 'your_token'

A request for getting the participants of VK groups will return a maximum of 1000 lines, to get the next 1000 ones we need to increment an offset parameter by 1. But we need to know when to stop incrementing so we will write a function that accepts an id of the group, receives the information about the number of group’s participants and returns the maximum number for the offset – the ratio of the total number of participants to 1000 as we can only get 1000 persons at a time.

def get_offset(group_id): 
    count = requests.get('https://api.vk.com/method/groups.getMembers', 
    params={ 
           'access_token':token, 
           'v':5.103, 
           'group_id': group_id, 
           'sort':'id_desc', 
           'offset':0, 
           'fields':'last_seen' 
    }).json()['response']['count'] 
    return count // 1000

In the next step, we will write a function that accepts the group’s ID, collects all the subscribers into a list and returns it. To do this we will send requests for receiving 1000 people till the offset is over, enter the data into the list and return it. When parsing each person, we will additionally check their last visit date and if they have not logged in since the middle of November, we won’t add them. The time is indicated in unixtime format.

def get_users(group_id): 
    good_id_list = [] 
    offset = 0 
    max_offset = get_offset(group_id) 
    while offset < max_offset: 
        response = requests.get('https://api.vk.com/method/groups.getMembers', 
        params={
        'access_token':token, 
        'v':5.103, 
        'group_id': group_id, 
        'sort':'id_desc', 
        'offset':offset, 
        'fields':'last_seen' }).json()['response'] 
        offset += 1 
        for item in response['items']: 
            try: 
                if item['last_seen']['time'] >= 1605571200:
                    good_id_list.append(item['id']) 
            except Exception as E: 
                continue 
    return good_id_list

Now we will parse all groups from the list, collect the participants, and add them into the all_users list. In the end, we will transfer the list into a set and then back into a list to get rid of the duplicates as the same people might have been members of different groups. After parsing each group, we will pause the program for a second to prevent reaching the requests limit.

all_users = [] 

for group in group_list: 
    print(group) 
    try: 
        users = get_users(group) 
        all_users.extend(users) 
        time.sleep(1) 
    except KeyError as E: 
        print(group, E) 
        continue 

all_users = list(set(all_users))

The last step will be writing each user to a file from a new line.

with open('users.txt', 'w') as f: 
    for item in all_users: 
        f.write("%s\n" % item)

Audience in the advertising account from a file

Let’s open our VK advertising account and choose a “Retargeting” tab. Here we will find the “Create audience” button:

After clicking it, a new window will pop up where we will be able to choose a file as a source and indicate the name of the audience.

The audience will be available some seconds after loading. First 10 minutes it will be indicated that the audience is too small, this is not true, and the panel will refresh soon if your audience really contains more than 100 people.

Results

Let’s compare the average cost of the attracted participant in our group when using the ad with automatic audience targeting and the ad with the audience that we have scraped. In the first case, the average cost is 52.4 rubles, in the second case 33.2 rubles. The selection of a quality audience by parsing data from VK helped us to reduce the average costs by 37%.
We have prepared this post for our advertising campaign:
Hey! You see this ad because we have parsed your id and made a file targeting in VK advertising account. Do you want to know how to do this?
LEFTJOIN – a blog about analytics, visualizations, Data Science and BI. A blog contains a lot of material on different BI and SQL tools, data visualizations and dashboards, work with different APIs (from Google Docs to social networks to the amateurs of beer) and interesting Python libraries.

 No comments    562   2021   api   python   VK   VK api

How to build a dashboard with Bootstrap 4 from scratch (Part 2)

Время чтения текста – 12 минут

Previously we shared how to use Bootstrap components in building dashboard layout and designed a simple yet flexible dashboard with a scatter plot and Russian map. In today’s material, we will continue adding more information, explore how to make Bootstrap tables responsive, and cover some complex callbacks for data acquisition.

Constructing Data Tables

All the code for populating our tables with data will be stored in get_tables.py , while the layout components areoutlined in  application.py. This article will cover the process of creating the table with top Russian Breweries, however, you can find the code for creating the other three on Github.

Data in the Top Breweries table can be filtered by city name in the dropdown menu, but the data collected in Untappd is not equally structured. Some city names are written in Latin, others in Cyrillic. So the challenge is to make the names equal for SQL queries, and here is where Google Translate comes to the rescue. Though we sill have to manually create a dictionary of city names, since for example “Москва” can be written as “Moskva” and not “Moscow”. This dictionary will be used later for mapping our DataFrame before transforming it into a Bootstrap table.

import pandas as pd
import dash_bootstrap_components as dbc
from clickhouse_driver import Client
import numpy as np
from googletrans import Translator

translator = Translator()

client = Client(host='12.34.56.78', user='default', password='', port='9000', database='')

city_names = {
   'Moskva': 'Москва',
   'Moscow': 'Москва',
   'СПБ': 'Санкт-Петербург',
   'Saint Petersburg': 'Санкт-Петербург',
   'St Petersburg': 'Санкт-Петербург',
   'Nizhnij Novgorod': 'Нижний Новгород',
   'Tula': 'Тула',
   'Nizhniy Novgorod': 'Нижний Новгород',
}

Top Breweries Table

This table displays top 10 Russian breweries and their position change according to the rating. Simply put, we need to compare data for two periods, that’s [30 days ago; today] and [60 days ago; 30 days ago]. With this in mind, we will need the following headers: ranking, brewery name, position change, and number of check-ins.
Create the  get_top_russian_breweries function that would make queries to the Clickhouse DB, sort the data and return a refined Pandas DataFrame. Let’s send the following queries to obtain data for the past 30 and 60 days, ordering the results by the number of check-ins.


Querying data from the Database

def get_top_russian_breweries(checkins_n=250):
   top_n_brewery_today = client.execute(f'''
      SELECT  rt.brewery_id,
              rt.brewery_name,
              beer_pure_average_mult_count/count_for_that_brewery as avg_rating,
              count_for_that_brewery as checkins FROM (
      SELECT           
              brewery_id,
              dictGet('breweries', 'brewery_name', toUInt64(brewery_id)) as brewery_name,
              sum(rating_score) AS beer_pure_average_mult_count,
              count(rating_score) AS count_for_that_brewery
          FROM beer_reviews t1
          ANY LEFT JOIN venues AS t2 ON t1.venue_id = t2.venue_id
          WHERE isNotNull(venue_id) AND (created_at >= (today() - 30)) AND (venue_country = 'Россия') 
          GROUP BY           
              brewery_id,
              brewery_name) rt
      WHERE (checkins>={checkins_n})
      ORDER BY avg_rating DESC
      LIMIT 10
      '''
   )

top_n_brewery_n_days = client.execute(f'''
  SELECT  rt.brewery_id,
          rt.brewery_name,
          beer_pure_average_mult_count/count_for_that_brewery as avg_rating,
          count_for_that_brewery as checkins FROM (
  SELECT           
          brewery_id,
          dictGet('breweries', 'brewery_name', toUInt64(brewery_id)) as brewery_name,
          sum(rating_score) AS beer_pure_average_mult_count,
          count(rating_score) AS count_for_that_brewery
      FROM beer_reviews t1
      ANY LEFT JOIN venues AS t2 ON t1.venue_id = t2.venue_id
      WHERE isNotNull(venue_id) AND (created_at >= (today() - 60) AND created_at <= (today() - 30)) AND (venue_country = 'Россия')
      GROUP BY           
          brewery_id,
          brewery_name) rt
  WHERE (checkins>={checkins_n})
  ORDER BY avg_rating DESC
  LIMIT 10
  '''
)

Creating two DataFrames with the received data:

top_n = len(top_n_brewery_today)
column_names = ['brewery_id', 'brewery_name', 'avg_rating', 'checkins']

top_n_brewery_today_df = pd.DataFrame(top_n_brewery_today, columns=column_names).replace(np.nan, 0)
top_n_brewery_today_df['brewery_pure_average'] = round(top_n_brewery_today_df.avg_rating, 2)
top_n_brewery_today_df['brewery_rank'] = list(range(1, top_n + 1))

top_n_brewery_n_days = pd.DataFrame(top_n_brewery_n_days, columns=column_names).replace(np.nan, 0)
top_n_brewery_n_days['brewery_pure_average'] = round(top_n_brewery_n_days.avg_rating, 2)
top_n_brewery_n_days['brewery_rank'] = list(range(1, len(top_n_brewery_n_days) + 1))

And then calculate the position change over the period of time for each brewery received. With the try-except block, we will handle exceptions, in case, if a brewery was not yet in our database 60 days ago.

rank_was_list = []
for brewery_id in top_n_brewery_today_df.brewery_id:
   try:
       rank_was_list.append(
           top_n_brewery_n_days[top_n_brewery_n_days.brewery_id == brewery_id].brewery_rank.item())
   except ValueError:
       rank_was_list.append('–')
top_n_brewery_today_df['rank_was'] = rank_was_list

Now we iterate over the columns with current and former positions. If there is no hyphen contained in, we will append an up or down arrow depending on the change.

diff_rank_list = []
for rank_was, rank_now in zip(top_n_brewery_today_df['rank_was'], top_n_brewery_today_df['brewery_rank']):
   if rank_was != '–':
       difference = rank_was - rank_now
       if difference > 0:
           diff_rank_list.append(f'↑ +{difference}')
       elif difference < 0:
           diff_rank_list.append(f'↓ {difference}')
       else:
           diff_rank_list.append('–')
   else:
       diff_rank_list.append(rank_was)

Finally, replace DataFrame headers, inserting the column with current ranking positions, where the top 3 will be displayed with the trophy emoji.

df = top_n_brewery_today_df[['brewery_name', 'avg_rating', 'checkins']].round(2)
df.insert(2, 'Position change', diff_rank_list)
df.columns = ['NAME', 'RATING', 'POSITION CHANGE', 'CHECK-INS']
df.insert(0, 'RANKING', list('🏆 ' + str(i) if i in [1, 2, 3] else str(i) for i in range(1, len(df) + 1)))

return df

Filtering data by city name

One of the main tasks we set before creating this dashboard was to find out what are the most liked breweries in a certain city. The user chooses a city in the dropdown menu and gets the results. Sound pretty simple, but is it that easy?
Our next step is to write a script that would update data for each city and store it in separate CSV files. As we mentioned earlier, the city names are not equally structured, so we need to use Google Translator within the if-else block, and since it may not convert some names to Cyrillic we need to explicitly specify such cases:

en_city = venue_city
if en_city == 'Nizhnij Novgorod':
      ru_city = 'Нижний Новгород'
elif en_city == 'Perm':
      ru_city = 'Пермь'
elif en_city == 'Sergiev Posad':
      ru_city = 'Сергиев Посад'
elif en_city == 'Vladimir':
      ru_city = 'Владимир'
elif en_city == 'Yaroslavl':
      ru_city = 'Ярославль'
else:
      ru_city = translator.translate(en_city, dest='ru').text

Then we need to add both city names in English and Russian to the SQL query, to receive all check-ins sent from this city.

WHERE (rt.venue_city='{ru_city}' OR rt.venue_city='{en_city}')

Finally, we export received data into a CSV file in the following directory – data/cities.

df = top_n_brewery_today_df[['brewery_name', 'venue_city', 'avg_rating', 'checkins']].round(2)
df.insert(3, 'Position Change', diff_rank_list)
df.columns = ['NAME', 'CITY', 'RATING', 'POSITION CHANGE', 'CHECK-INS']
# MAPPING
df['CITY'] = df['CITY'].map(lambda x: city_names[x] if (x in city_names) else x)
# TRANSLATING
df['CITY'] = df['CITY'].map(lambda x: translator.translate(x, dest='en').text)
df.to_csv(f'data/cities/{en_city}.csv', index=False)
print(f'{en_city}.csv updated!')

Scheduling Updates

We will use the apscheduler library to automatically run the script and refresh data for each city in all_cities every day at 10:30 am (UTC).

from apscheduler.schedulers.background import BackgroundScheduler
from get_tables import update_best_breweries

all_cities = sorted(['Vladimir', 'Voronezh', 'Ekaterinburg', 'Kazan', 'Red Pakhra', 'Krasnodar',
             'Kursk', 'Moscow', 'Nizhnij Novgorod', 'Perm', 'Rostov-on-Don', 'Saint Petersburg',
             'Sergiev Posad', 'Tula', 'Yaroslavl'])

scheduler = BackgroundScheduler()
@scheduler.scheduled_job('cron', hour=10, misfire_grace_time=30)
def update_data():
   for city in all_cities:
       update_best_breweries(city)
scheduler.start()

Table from DataFrame

get_top_russian_breweries_table(venue_city, checkins_n=250)  will accept venue_city and checkins_n generating a Bootstrap Table with the top breweries. The second parameter value, checkins_n can be changed with the slider. If the city name is not specified, the function will return top Russian breweries table.

if venue_city == None: 
      selected_df = get_top_russian_breweries(checkins_n)
else: 
      en_city = venue_city

In other case the DataFrame will be constructed from a CSV file stored in data/cities/. Since the city column still may contain different names we should apply mapping and use a lambda expression with the map() method. The lambda function will compare values in the column against keys in city_names and if there is a match, the column value will be overwritten.
For instance, if df[‘CITY’] contains “СПБ”, a frequent acronym for Saint Petersburg, the value will be replaced, while for “Воронеж” it will remain unchanged.
And last but not least, we need to remove all duplicate rows from the table, add a column with a ranking position and return the first 10 rows. These would be the most liked breweries in a selected city.

df = pd.read_csv(f'data/cities/{en_city}.csv')     
df = df.loc[df['CHECK-INS'] >= checkins_n]
df.drop_duplicates(subset=['NAME', 'CITY'], keep='first', inplace=True)  
df.insert(0, 'RANKING', list('🏆 ' + str(i) if i in [1, 2, 3] else str(i) for i in range(1, len(df) + 1)))
selected_df = df.head(10)

After all DataFrame manipulations, the function returns a simply styled Bootstrap table of top breweries.


Bootstrap table layout in DBC

table = dbc.Table.from_dataframe(selected_df, striped=False,
                                bordered=False, hover=True,
                                size='sm',
                                style={'background-color': '#ffffff',
                                       'font-family': 'Proxima Nova Regular',
                                       'text-align':'center',
                                       'fontSize': '12px'},
                                className='table borderless'
                                )

return table

Layout structure

Add a Slider and a Dropdown menu with city names in application.py

To learn more about the Dashboard layout structure, please refer to our previous guide

checkins_slider_tab_1 = dbc.CardBody(
                           dbc.FormGroup(
                               [
                                   html.H6('Number of check-ins', style={'text-align': 'center'})),
                                   dcc.Slider(
                                       id='checkin_n_tab_1',
                                       min=0,
                                       max=250,
                                       step=25,
                                       value=250,  
                                       loading_state={'is_loading': True},
                                       marks={i: i for i in list(range(0, 251, 25))}
                                   ),
                               ],
                           ),
                           style={'max-height': '80px', 
                                  'padding-top': '25px'
                                  }
                       )

top_breweries = dbc.Card(
       [
           dbc.CardBody(
               [
                   dbc.FormGroup(
                       [
                           html.H6('Filter by city', style={'text-align': 'center'}),
                           dcc.Dropdown(
                               id='city_menu',
                               options=[{'label': i, 'value': i} for i in all_cities],
                               multi=False,
                               placeholder='Select city',
                               style={'font-family': 'Proxima Nova Regular'}
                           ),
                       ],
                   ),
                   html.P(id="tab-1-content", className="card-text"),
               ],
           ),
   ],
)

We’ll also need to add a callback function to update the table by dropdown menu and slider values:

@app.callback(
   Output("tab-1-content", "children"), [Input("city_menu", "value"),
                                         Input("checkin_n_tab_1", "value")]
)
def table_content(city, checkin_n):
   return get_top_russian_breweries_table(city, checkin_n)

Tada, the main table is ready! The dashboard can be used to receive up-to-date info about best Russian breweries, beers, and its rating across different regions, and help to make a better choice for an enjoyable tasting experience.

View the code on GitHub

 No comments    625   2020   BI-tools   bootstrap   dash   plotly   python

Collecting Social Media Data for Top ML, AI & Data Science related accounts on Instagram

Время чтения текста – 9 минут

Instagram is in the top 5 most visited websites, perhaps not for our industry. Nevertheless, we are going to test this hypothesis using Python and our data analytics skills. In this post, we will share how to collect social media data using the Instagram API.

Data collection method
The Instagram API won’t let us collect data about other platform users for no reason, but there is always a way. Try sending the following request:

https://instagram.com/leftjoin/?__a=1

The request returns a JSON object with detailed user information, for instance, we can easily get an account name, number of posts, followers, subscriptions, as well as the first ten user posts with likes count, comments and etc. The pyInstagram library allows sending such requests.

SQL schema
Data will be collected into thee Clickhouse tables: users, posts, comments. The users table will contain user data, such as user id, username, user’s first and last name, account description, number of followers, subscriptions, posts, comments, and likes, whether an account is verified or not, and so on.

CREATE TABLE instagram.users
(
    `added_at` DateTime,
    `user_id` UInt64,
    `user_name` String,
    `full_name` String,
    `base_url` String,
    `biography` String,
    `followers_count` UInt64,
    `follows_count` UInt64,
    `media_count` UInt64,
    `total_comments` UInt64,
    `total_likes` UInt64,
    `is_verified` UInt8,
    `country_block` UInt8,
    `profile_pic_url` Nullable(String),
    `profile_pic_url_hd` Nullable(String),
    `fb_page` Nullable(String)
)
ENGINE = ReplacingMergeTree
ORDER BY added_at

The posts table will be populated with the post owner name, post id, caption, comments coun, and so on. To check whether a post is an advertisement, Instagram carousel, or a video we can use these fields: is_ad, is_album and is_video.

CREATE TABLE instagram.posts
(
    `added_at` DateTime,
    `owner` String,
    `post_id` UInt64,
    `caption` Nullable(String),
    `code` String,
    `comments_count` UInt64,
    `comments_disabled` UInt8,
    `created_at` DateTime,
    `display_url` String,
    `is_ad` UInt8,
    `is_album` UInt8,
    `is_video` UInt8,
    `likes_count` UInt64,
    `location` Nullable(String),
    `recources` Array(String),
    `video_url` Nullable(String)
)
ENGINE = ReplacingMergeTree
ORDER BY added_at

In the comments table, we store each comment separately with the comment owner and text.

CREATE TABLE instagram.comments
(
    `added_at` DateTime,
    `comment_id` UInt64,
    `post_id` UInt64,
    `comment_owner` String,
    `comment_text` String
)
ENGINE = ReplacingMergeTree
ORDER BY added_at

Writing the script
Import the following classes from the library: Account, Media, WebAgent and Comment.

from instagram import Account, Media, WebAgent, Comment
from datetime import datetime
from clickhouse_driver import Client
import requests
import pandas as pd

Next, create an instance of the WebAgent class required for some library methods and data updating. To collect any meaningful information we need to have at least account names. Since we don’t have them yet, send the following request to search for porifles by the  keywords specified in queries_list. The search results will be composed of Instagram pages that match any keyword in the list.

agent = WebAgent()
queries_list = ['machine learning', 'data science', 'data analytics', 'analytics', 'business intelligence',
                'data engineering', 'computer science', 'big data', 'artificial intelligence',
                'deep learning', 'data scientist','machine learning engineer', 'data engineer']
client = Client(host='12.34.56.789', user='default', password='', port='9000', database='instagram')
url = 'https://www.instagram.com/web/search/topsearch/?context=user&count=0'

Let’s iterate the keywords collecting all matching accounts. Then remove duplicates from the obtained list by converting it to set and back.

response_list = []
for query in queries_list:
    response = requests.get(url, params={
        'query': query
    }).json()
    response_list.extend(response['users'])
instagram_pages_list = []
for item in response_list:
    instagram_pages_list.append(item['user']['username'])
instagram_pages_list = list(set(instagram_pages_list))

Now we need to loop through the list of pages and request detailed information about an account if it’s not in the table yet. Create an instance of the Account class and pass username as a parameter.
Then update the account information using the agent.update()
method. We will collect only the first 100 posts to keep it moving. Next, create a list named media_list to store received post ids after calling the agent.get_media() method.


Collecting user media data

all_posts_list = []
username_count = 0
for username in instagram_pages_list:
    if client.execute(f"SELECT count(1) FROM users WHERE user_name='{username}'")[0][0] == 0:
        print('username:', username_count, '/', len(instagram_pages_list))
        username_count += 1
        account_total_likes = 0
        account_total_comments = 0
        try:
            account = Account(username)
        except Exception as E:
            print(E)
            continue
        try:
            agent.update(account)
        except Exception as E:
            print(E)
            continue
        if account.media_count < 100:
            post_count = account.media_count
        else:
            post_count = 100
        print(account, post_count)
        media_list, _ = agent.get_media(account, count=post_count, delay=1)
        count = 0

Because we need to count the total number of likes and comments before adding a new user to our database, we’ll start with them first. Almost all required fields belong to the Media class:


Collecting user posts

for media_code in media_list:
            if client.execute(f"SELECT count(1) FROM posts WHERE code='{media_code}'")[0][0] == 0:
                print('posts:', count, '/', len(media_list))
                count += 1

                post_insert_list = []
                post = Media(media_code)
                agent.update(post)
                post_insert_list.append(datetime.now().strftime('%Y-%m-%d %H:%M:%S'))
                post_insert_list.append(str(post.owner))
                post_insert_list.append(post.id)
                if post.caption is not None:
                    post_insert_list.append(post.caption.replace("'","").replace('"', ''))
                else:
                    post_insert_list.append("")
                post_insert_list.append(post.code)
                post_insert_list.append(post.comments_count)
                post_insert_list.append(int(post.comments_disabled))
                post_insert_list.append(datetime.fromtimestamp(post.date).strftime('%Y-%m-%d %H:%M:%S'))
                post_insert_list.append(post.display_url)
                try:
                    post_insert_list.append(int(post.is_ad))
                except TypeError:
                    post_insert_list.append('cast(Null as Nullable(UInt8))')
                post_insert_list.append(int(post.is_album))
                post_insert_list.append(int(post.is_video))
                post_insert_list.append(post.likes_count)
                if post.location is not None:
                    post_insert_list.append(post.location)
                else:
                    post_insert_list.append('')
                post_insert_list.append(post.resources)
                if post.video_url is not None:
                    post_insert_list.append(post.video_url)
                else:
                    post_insert_list.append('')
                account_total_likes += post.likes_count
                account_total_comments += post.comments_count
                try:
                    client.execute(f'''
                        INSERT INTO posts VALUES {tuple(post_insert_list)}
                    ''')
                except Exception as E:
                    print('posts:')
                    print(E)
                    print(post_insert_list)

Store comments in the variable with the same name after calling the get_comments() method:


Collecting post comments

comments = agent.get_comments(media=post)
                for comment_id in comments[0]:
                    comment_insert_list = []
                    comment = Comment(comment_id)
                    comment_insert_list.append(datetime.now().strftime('%Y-%m-%d %H:%M:%S'))
                    comment_insert_list.append(comment.id)
                    comment_insert_list.append(post.id)
                    comment_insert_list.append(str(comment.owner))
                    comment_insert_list.append(comment.text.replace("'","").replace('"', ''))
                    try:
                        client.execute(f'''
                            INSERT INTO comments VALUES {tuple(comment_insert_list)}
                        ''')
                    except Exception as E:
                        print('comments:')
                        print(E)
                        print(comment_insert_list)

And now, when we have obtained user posts and comments new information can be added to the table.


Collecting user data

user_insert_list = []
        user_insert_list.append(datetime.now().strftime('%Y-%m-%d %H:%M:%S'))
        user_insert_list.append(account.id)
        user_insert_list.append(account.username)
        user_insert_list.append(account.full_name)
        user_insert_list.append(account.base_url)
        user_insert_list.append(account.biography)
        user_insert_list.append(account.followers_count)
        user_insert_list.append(account.follows_count)
        user_insert_list.append(account.media_count)
        user_insert_list.append(account_total_comments)
        user_insert_list.append(account_total_likes)
        user_insert_list.append(int(account.is_verified))
        user_insert_list.append(int(account.country_block))
        user_insert_list.append(account.profile_pic_url)
        user_insert_list.append(account.profile_pic_url_hd)
        if account.fb_page is not None:
            user_insert_list.append(account.fb_page)
        else:
            user_insert_list.append('')
        try:
            client.execute(f'''
                INSERT INTO users VALUES {tuple(user_insert_list)}
            ''')
        except Exception as E:
            print('users:')
            print(E)
            print(user_insert_list)

Conclusion
To sum up, we have collected data of 500 users, with nearly 20K posts and 40K comments. As the database will be updated, we can write a simple query to get the top 10 ML, AI & Data Science related most followed accounts for today.

SELECT *
FROM users
ORDER BY followers_count DESC
LIMIT 10

And as a bonus, here is a list of the most interesting Instagram accounts on this topic:

  1. @ai_machine_learning
  2. @neuralnine
  3. @datascienceinfo
  4. @compscistuff
  5. @computersciencelife
  6. @welcome.ai
  7. @papa_programmer
  8. @data_science_learn
  9. @neuralnet.ai
  10. @techno_thinkers

View the code on GitHub

 No comments    412   2020   Analytics engineering   clickhouse   data analytics   instagram   python

Pandas Profiling in action: reviewing a new EDA library on Superstore Sales dataset

Время чтения текста – 8 минут

Before moving directly to data analysis we need to understand what type of data we are going to work with. In today’s material, we will take a closer look at the SuperStore Sales dataset, specifically at the Orders column. It includes customer shopping data of a Canadian online supermarket, such as order, product and customer ids, type of shipping, prices, product categories, names and etc. You can find more information about this dataset on GitHub. After creating a pandas DataFrame we can simply use the describe() method to get a sense of our data.

import pandas as pd

df = pd.read_csv('superstore_sales_orders.csv', decimal=',')
df.describe(include='all')

And oftentimes it leads to such a mess:

The source code of this library is available on GitHub

If we spend some time trying to get a grasp of this descriptive table, we can find out that customers are more likely to choose “Regular air” as a shipping type or that the majority of orders were made from Ontario. Nevertheless, there is a better tool to describe the dataset in more detail  – the pandas-profiling library. Just pass a DataFrame to it and we will get a generated HTML page with a detailed description of our dataset:

import pandas_profiling
profile = pandas_profiling.ProfileReport(df)
profile.to_file("output.html")

As you see, it returned a page with 6 sections, namely: overview, variables, interactions and correlations, number of missing values, and dataset samples.

View a full version of the Pandas Profiling Report

Data overview

Let’s move to the first subsection called “Overview”. Pandas Profiling provided the following stats: number of variables, number of observations, missing cells, duplicates, and file size. The  Variable types column shows that our DataFrame consists of 12 categorical and 9 numerical variables.

The  “Reproduction” subsection stores technical information, showing how long it took to analyze the dataset, currently installed version , configuration info and etc.

The  “Warnings” subsection informs about possible issues in the dataset structure. Now, it warns us that the “Order Date” column has too many distinct values.

Variables

Moving further, this subsection contains a detailed description of each variable, displaying the number of duplicates and missing values stored, memory size, maximum and minimal values. Right next to the stats you can see the distribution of column values.

Clicking on  Toggle details you will see more expanded information: quartiles, median and other useful descriptive statistical indicators. The remaining tabs contain a histogram displayed on the main screen, top 10 frequent values and extremes.

Interactions

This section displays how variables are interconnected on a hexbin plot: The graph looks not very obvious and clear, since the legend is lacking.

Correlations

The section represents correlations between variables calculated in a variety of ways. For example, the first tab shows Pearson’s r-value. It is noticeable that Profit is positively correlated with Sales. You can get a detailed explanation to each coefficient by clicking on the Toggle correlation descriptions button.

Missing values

This section includes a bar chart, matrix, and dendrogram with the number of fields in each variable. For instance, the  Product Base Margin column is missing three values.

Samples

And the final section show the first and last 10 rows as chunks of a dataset, pretty similar to the  head() method in Pandas.

Key Takeaways

The library is definitely more focused on statistics than Pandas, one can get useful descriptive stats for each variable and see their correlation. It provides a comprehensive report on a dataset in a user-friendly way, allowing to undertake an initial investigation and get a sense of data.
Still, the library has its shortfalls. If your dataset is fairly large the report generation time may be extended up to several hours. It’s a great tool for automating EDA tasks, however, it can’t do all the work for you and some details may be overlooked. If you are just getting started with data analysis, we would highly recommend to start it with pandas. It will solidify your knowledge and boost confidence in working with data.

 No comments    350   2020   BI-tools   pandas   pandas-profiling   python   visualisation
Earlier Ctrl + ↓